
Roofing & Exterior
Detect and Fix Roof Leaks Before Mold Spreads: 2026 Guide
FixingManual explains safe roof-leak observations, professional tracing, prompt drying, mold-related concerns, and how to separate roof repair from interior cleanup.

Image disclosure: Images are AI-generated illustrations, not photographs of FixingManual projects or hands-on product tests.
Detect and fix roof leaks as early as possible when you notice ceiling stains, damp attic materials, or recurring moisture around roof penetrations. A visible drip is often the end of a longer water path rather than the exact point where rain entered the roof. Roof water can move along rafters, roof decking, valleys, insulation, and wall cavities before finally becoming visible indoors.
This Fixing Manual guide shows how to trace a hidden leak, check common roof entry points, use non-invasive moisture detection, make temporary emergency repairs, and understand when moisture has progressed far enough to require professional roofing or mold-remediation help.
Why You Should Detect and Fix Roof Leaks Before Mold Spreads
EPA recommends drying water-damaged materials within 24–48 hours to help prevent mold growth. Mold spores occur naturally indoors and outdoors, but wet drywall paper, wood framing, and roof decking can support growth. The 24–48 hour period is a drying target, not a precise timetable for mold to appear.
That is why a slow roof leak should be treated as more than a cosmetic ceiling problem. Water can saturate attic insulation, swell wood, soften drywall, and create conditions that support microbial growth before a large stain appears in the room below.
| Observed condition | Priority | What to verify |
|---|---|---|
| Active dripping or spreading stains | Arrange prompt source repair and safe drying | Keep people away from wet wiring and sagging ceilings; do not climb onto a wet roof. |
| Wet materials after the leak is stopped | Begin effective drying promptly | EPA recommends drying water-damaged materials within 24–48 hours to help prevent mold. |
| Persistent dampness, musty odor, or visible growth | Have concealed areas and affected materials assessed | A dry-looking surface does not establish that insulation or a wall cavity is dry. |
| Before interior finishes are replaced | Document moisture conditions and completion of repairs | Confirm the roof repair and interior drying separately; elapsed time alone is not clearance. |
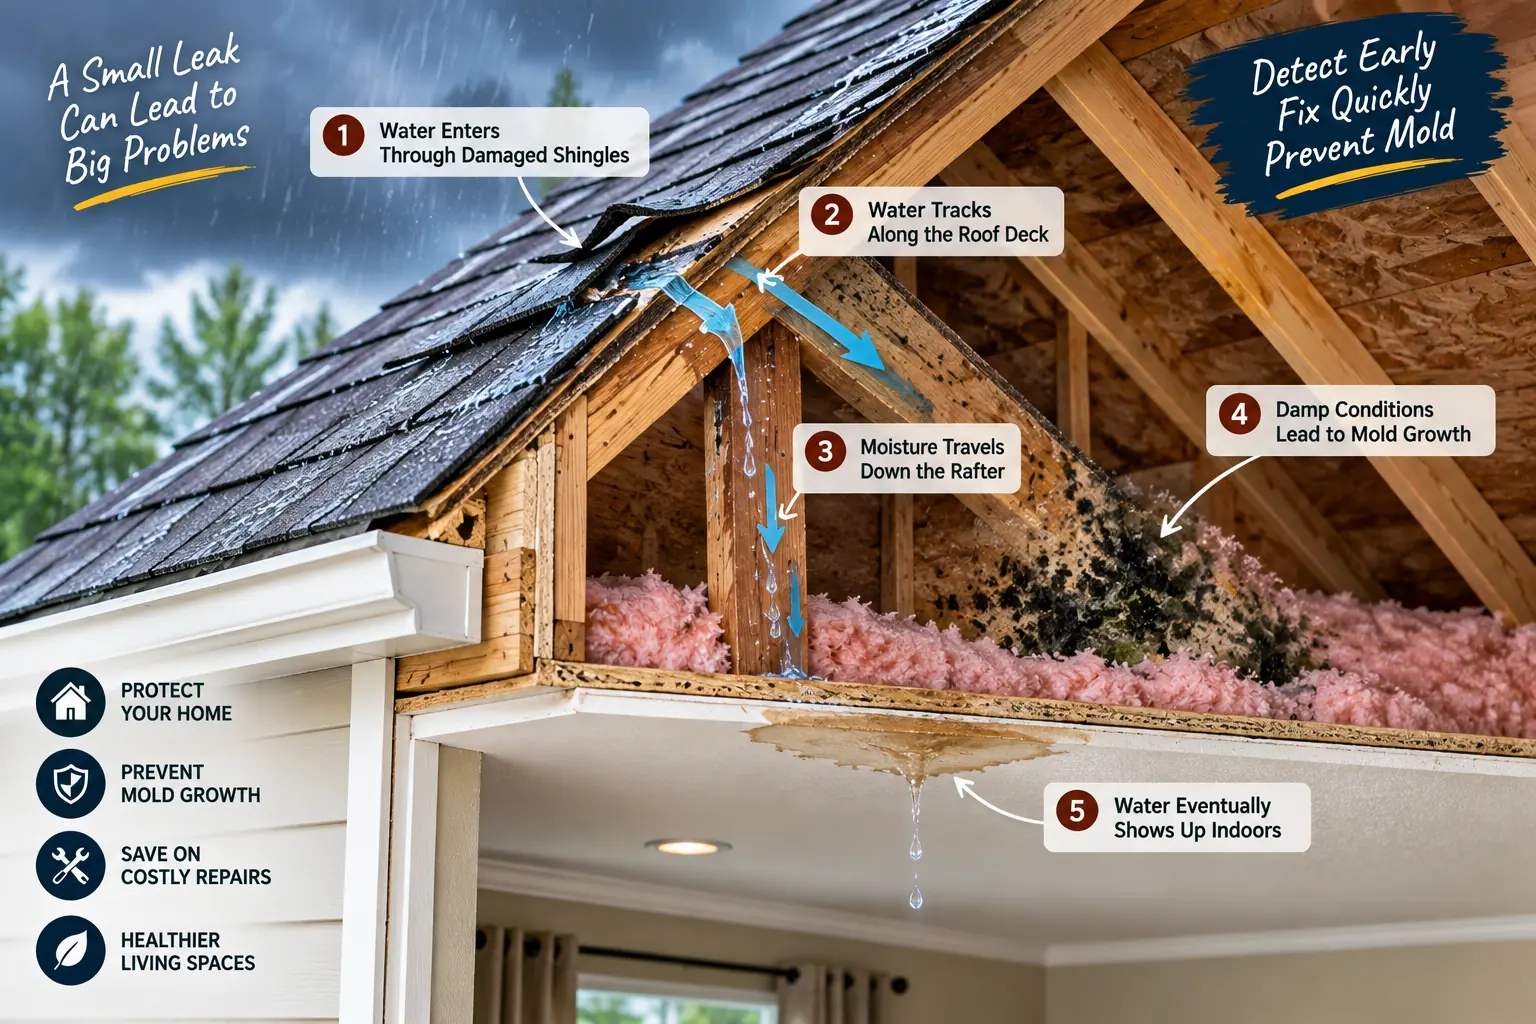
How to Detect and Fix Roof Leaks: Start by Tracing the Water Path
Water rarely drops straight down from the exterior breach to the ceiling stain. Roof slope, gravity, surface tension, framing members, and insulation can redirect it. The stain you see inside may therefore be several feet away from the actual entry point.
Trace moisture upward in the attic
If the attic is safely accessible, an inspection may help trace the leak. Stay on supported flooring and avoid wet wiring, unstable surfaces, and mold-contaminated areas. During or soon after rain, use a bright flashlight and follow reflective moisture trails, darkened wood, damp insulation, or staining along rafters, valley boards, and top plates. Work upward from the visible interior symptom toward the roof deck. This trace-back process helps you detect and fix roof leaks at the actual entry point instead of repairing only the ceiling stain.
Inspect roof penetrations and flashing
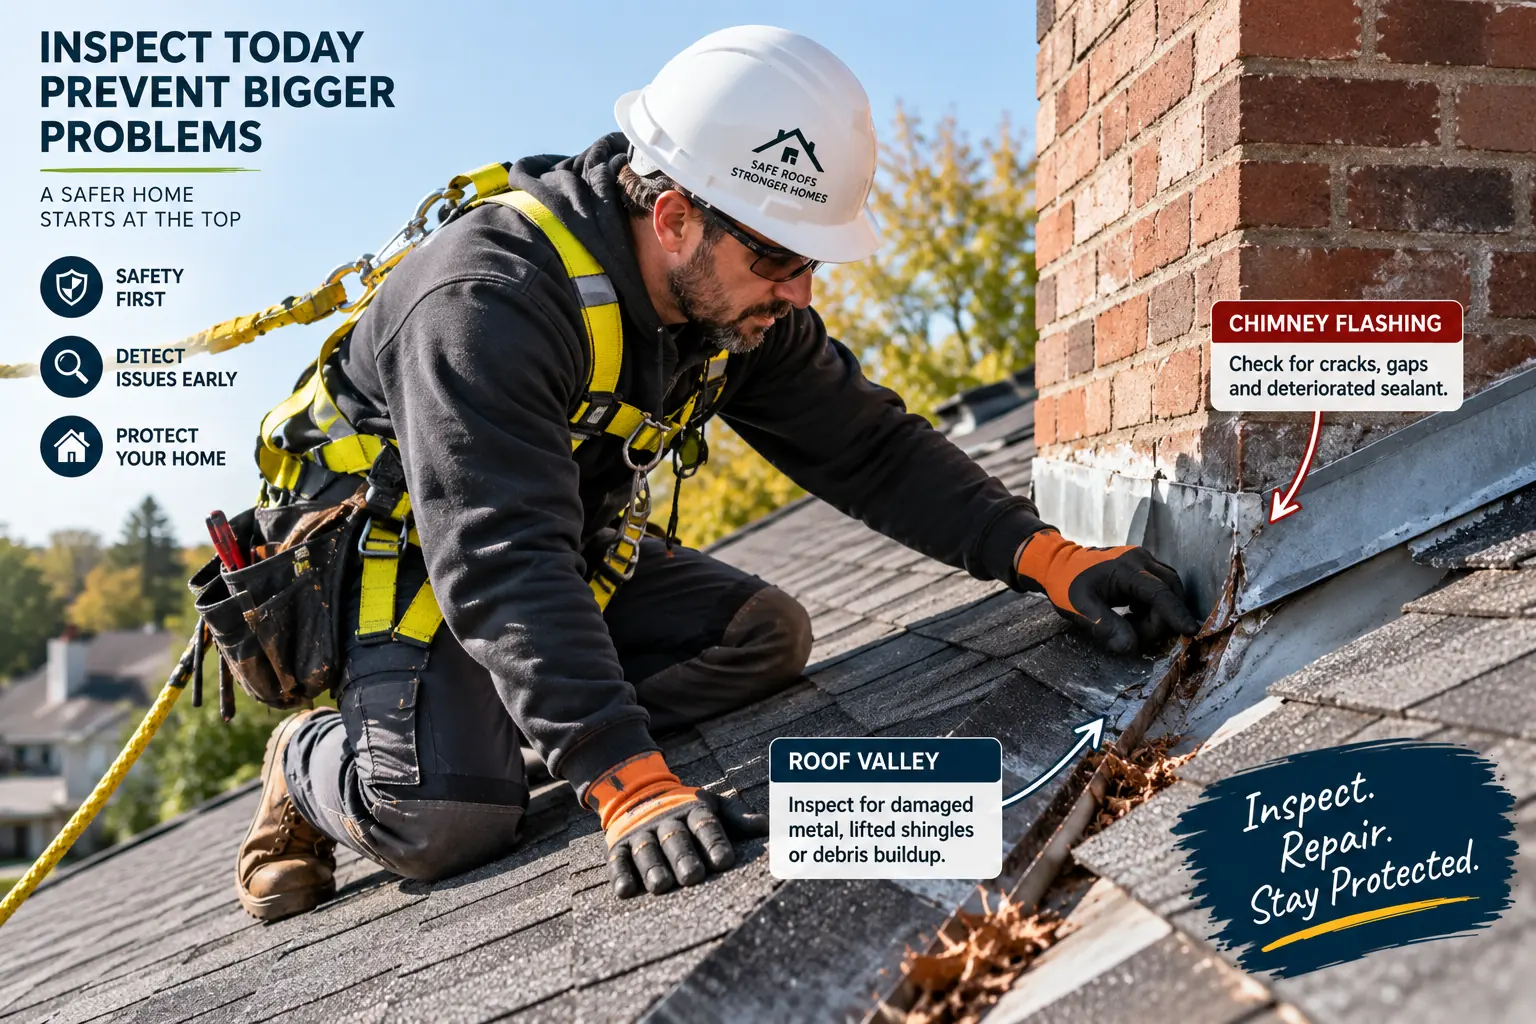
Roof penetrations are important inspection points. Ask the roofer to check plumbing vent boots, chimney flashing, attic exhaust penetrations, dormer transitions, valleys, cracked sealant, rusted metal, lifted shingles, and deteriorated rubber boots.
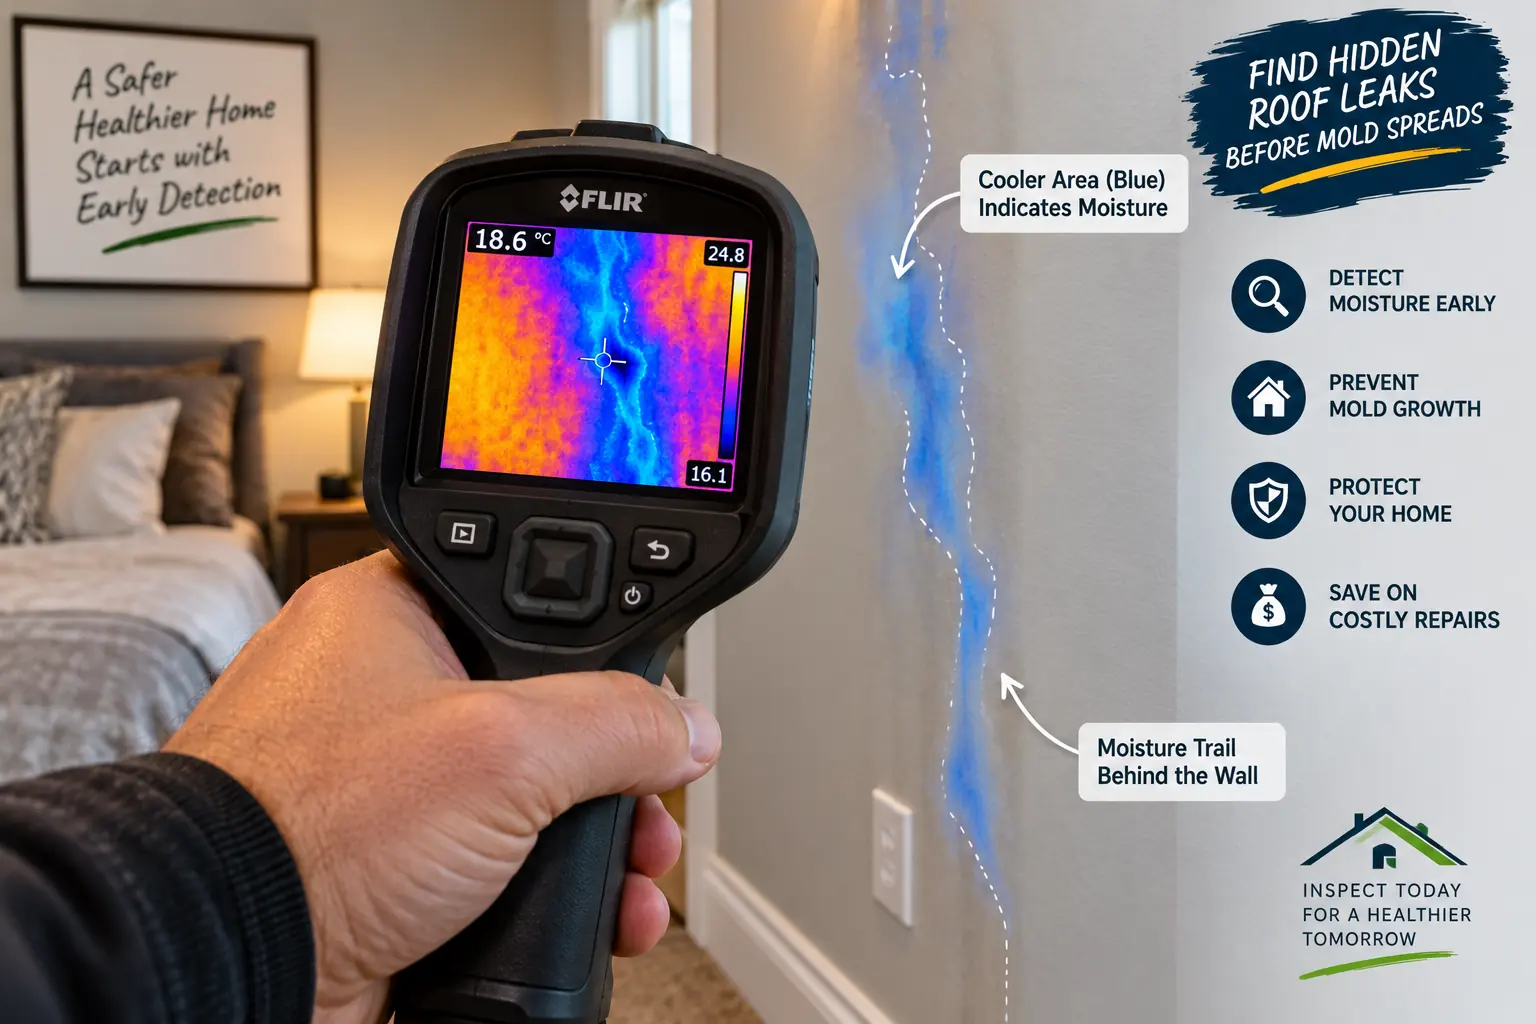
Use Thermal Imaging for Hidden Roof Leak Detection
A qualified inspector may use thermal imaging to identify temperature differences that suggest hidden moisture behind drywall or insulation. A thermal image does not prove that water is present; suspected areas need confirmation with suitable moisture measurements and inspection.
Thermal imaging does not replace physical confirmation, but it can help narrow the search area before opening finishes. Once a suspicious zone is found, confirm the moisture source and trace it back toward the roof rather than assuming the coolest point is automatically the exterior breach. Used correctly, it can support hidden roof leak detection without unnecessary demolition.
Controlled Water Testing for Difficult Roof Leaks
A roofer may use a controlled water test when dry-weather inspection does not identify the leak. Water is applied to limited roof sections while an observer checks inside. Testing should be planned to avoid worsening damage and performed by professionals where roof access, wiring, or structural conditions present hazards.
This method should only be used when conditions are safe. Do not work on a wet, steep, icy, or unstable roof. For high-pitch or multi-story roofs, use a qualified roofer with appropriate fall protection.
Emergency Steps to Limit Interior Water Damage
During an active leak, keep people away from wet wiring and sagging ceilings. Contain drips only where safe, arrange prompt roof repair, and begin drying accessible areas after electrical and structural hazards have been addressed. The following priorities need to be adapted to the conditions in your home.
- Contain active drips. Place durable containers beneath leaking areas and protect nearby furnishings and flooring.
- Relieve trapped ceiling water carefully. If water is pooling behind sagging drywall, the guide describes creating a small controlled drainage point so water can be directed into a container rather than allowing an uncontrolled ceiling collapse.
- Use a temporary exterior tarp when conditions are safe. The source recommends extending the tarp over the roof ridge so water cannot easily run underneath the top edge.
- Begin drying immediately. Remove heavily wet insulation around the affected area where appropriate and use air movement and dehumidification to reduce moisture.
If storm damage is the cause and you need to understand short-term repair pricing, see our emergency roof repair cost after storm damage guide.
Drying and Mold Prevention After a Roof Leak
EPA moisture guidance recommends drying wet materials within 24–48 hours and keeping indoor humidity below 60%, ideally 30–50%. Porous materials affected by mold may require disposal. Extensive damage, contaminated water, or suspected hidden mold warrants professional assessment. This drying stage is central to roof leak mold prevention after the source of water has been controlled.
EPA does not recommend biocides, including bleach, as a routine mold-cleanup practice. Fixing the moisture problem and removing mold are essential; a professional should assess contaminated porous framing or hidden growth. Review the EPA mold guidance linked above before attempting cleanup.
2026 Roof Leak Repair and Mold Remediation Cost Examples
The following figures are illustrative planning allowances, not verified national averages or local contractor quotes. Actual prices can differ by roof type, region, access, material availability, damage extent, and contractor scope.
HomeGuide’s roof-repair guide, dated February 9, 2026, lists the broad categories below. They are national screening references, not a quote for an individual roof or a separate mold-cleanup estimate.
| Published repair category | Guide range | Check separately |
|---|---|---|
| Minor roof repairs | $150–$1,000 | Access, minimum visit charge, and actual source of the leak |
| Moderate roof repairs | $1,000–$3,000 | Extent of roofing, underlayment, or decking work |
| Major roof repairs | $3,000–$6,000+ | Structural findings, significant water damage, and included restoration |
Ask who prices drying, wet-insulation removal, interior finishes, and any mold remediation. Do not assume a roof-repair total includes these tasks or add them again when they are already included.
The comparison shows why it is usually cheaper to detect and fix roof leaks before moisture spreads through multiple layers of the home. A localized flashing repair can be much smaller in scope than roof deck replacement plus interior reconstruction and mold remediation. Early roof leak mold prevention can also reduce the chance that a roofing problem becomes an indoor remediation project.
When to Call a Professional Roofing or Remediation Team
Seek professional help rather than continuing DIY work in the following situations.
- Extensive mold or water damage: EPA homeowner guidance suggests considering professional cleanup when growth exceeds about 10 square feet or water damage is extensive. Contaminated water, hidden growth, or health concerns can require help at a smaller area too.
- Sagging or soft structural wood: Bowed rafters, soft decking, or visibly weakened framing can indicate loss of structural integrity.
- Any hazardous roof access: Height, slope, weather, fragile surfaces, and access all affect fall risk. Leave roof work to trained contractors with appropriate protection; a lower slope is not a safe-access guarantee.
- Recurring leaks after a patch: Repeated water entry can mean the original source was not fully identified or repaired.
For work at height, follow appropriate safety practices and professional fall-protection requirements. The OSHA fall-protection guidance provides additional information on working safely around fall hazards.
Keep Roof Repair and Interior Drying as Separate Checks
Ask the roofer what entry point was identified and how the repair will be checked. Separately, ask who evaluates wet insulation, drywall, and concealed areas before the interior is closed. A repaired roof does not document that the materials below are dry. Our restoration guide explains the drying records to request, while the emergency roof repair guide separates temporary protection from permanent repairs.
Frequently Asked Questions
How Quickly Can Mold Start After a Roof Leak?
EPA recommends drying water-damaged materials within 24–48 hours to help prevent mold. This is a prevention target, not a guarantee of when mold will appear.
Why Is the Ceiling Stain Not Always Directly Below the Roof Leak?
Water can travel along roof decking, rafters, valleys, insulation, and wall cavities before it appears indoors. Trace moisture upward toward the roof deck rather than assuming the visible stain marks the exact exterior entry point.
Can a Thermal Camera Find a Hidden Roof Leak?
Thermal imaging can help identify suspicious cool or thermally different areas associated with wet materials, but the result should be confirmed by physical moisture inspection and leak tracing.
When Should I Stop DIY Roof Leak Repairs?
Use professional help when the roof is steep or multi-story, framing is soft or sagging, mold covers a larger area, or the leak keeps returning after temporary repairs.
Final Takeaway
The safest way to control roof water damage is to detect and fix roof leaks before moisture spreads through the attic and interior finishes. Trace the water path methodically, inspect flashing and penetrations, confirm hidden moisture where necessary, contain active leaks, and dry affected materials promptly. When structural damage, steep-roof access, or significant mold is involved, move from temporary DIY control to qualified professional repair.
Keep reading
Related Articles

Roofing & Exterior
How to Choose Asphalt Shingles for Your Next Residential Project

Roofing & Exterior